Turn AO Maps Into Your Secret Weapon for Believable 3D Scenes
By Max Calder | 13 October 2025 | 13 mins read
Table of contents
Table of Contents
Ever create a beautifully detailed model that just… floats? It sits in your scene looking strangely disconnected, like a sticker on a background, and you can’t quite put your finger on why. That nagging issue often comes down to one of the most subtle yet powerful tools in your texturing arsenal: the ambient occlusion (AO) map. In this guide, we're going to unpack exactly what AO is, how to bake it cleanly, and most importantly, how to use it to ground your assets and make your environments feel truly immersive. It's the secret sauce that adds the tiny, soft contact shadows our brains expect to see, telling us an object truly belongs in its world. Getting it right is less about complex lighting theory and more about a practical workflow that adds a crucial layer of realism to your game environments without bogging you down.

Unpack the concept: What ambient occlusion actually does
You’ve likely noticed it before, a model that feels detached from its surroundings, as if it doesn’t quite sit naturally within the scene. It’s a common problem, and the fix is often simpler than you think. It comes down to faking one of the most subtle, yet powerful, aspects of lighting: contact shadows. This is the domain of ambient occlusion maps.
What exactly are ambient occlusion maps?
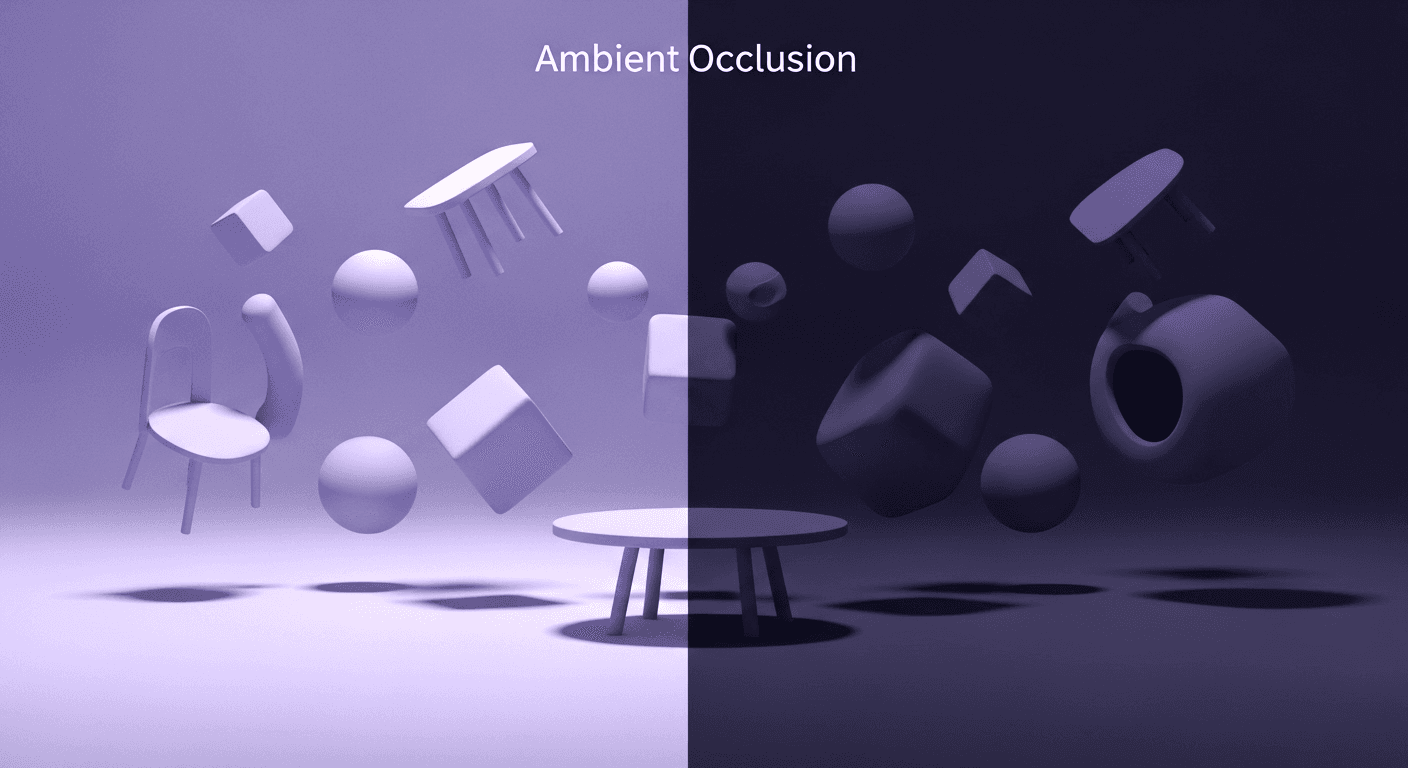
Think of an ambient occlusion (AO) map as a grayscale texture that stores information about how exposed each point on your model is to ambient light. In simpler terms, it’s a map of all the tiny, soft shadows that appear in crevices, corners, and overlapping areas. It’s not the sharp, hard shadow you get from a direct light source like the sun. Instead, it’s the subtle darkening you see in the corners of a room on a cloudy day, or the grime that collects in the seams of a metal plate.
An AO map doesn't care where the lights are in your scene. It only cares about the model's own geometry. A white area on the map means that the surface is wide open and can receive light from all directions. A black or gray area means it’s tucked away in a crevice, occluded from receiving ambient light. This simple piece of data is the key to adding believable depth and grounding your assets in the scene.
How AO maps improve 3D scene realism
Without AO, even the most detailed models can look flat and artificial, like they were pasted onto the screen. This is because, in the real world, light doesn’t hit every surface equally. It bounces around, gets trapped, and fades away in tight spaces. AO simulates this behavior, creating a sense of history and place.
Imagine a pile of rubble. Without AO, the rocks look like a jumble of separate objects. With AO, you suddenly see the soft shadows where they press against each other, making the pile feel like a single, unified feature. Or think of a character's armor. The AO map adds that touch of darkness where the chest plate overlaps the shoulder guard, instantly making it feel more constructed and solid.
This is the difference between a model that exists and one that belongs. It’s a subtle effect that the viewer might not consciously notice, but their brain absolutely will. It’s the visual cue that says, “This object is part of this world.”
AO vs. Global illumination techniques
It’s easy to confuse AO with other lighting methods, especially when you hear terms like baking and ray tracing. So let's clear that up. Think of your lighting tools as a spectrum of quality versus performance, especially critical in game development.
- Baked ambient occlusion (your AO map): This is what we're focused on. It’s a pre-calculated effect baked into a texture map. Use it for: high-quality, static contact shadows on your props, environments, and characters. It’s incredibly efficient because the lighting calculation is done once, offline.
- Real-time ambient occlusion (like SSAO): Screen-Space Ambient Occlusion (SSAO) is a post-processing effect that calculates occlusion dynamically every frame. It's fast, but less accurate than a baked map, and can sometimes produce artifacts. Use it for: adding dynamic contact shadows for moving objects or characters interacting with the environment, where a baked map won't work.
- Full global illumination (GI): This is the holy grail of techniques like ray tracing or lightmapping that simulate the actual bouncing of light around a scene. It produces stunningly realistic results, including soft shadows, color bleeding, and indirect lighting. The catch? It's computationally expensive. Full real-time GI is still demanding, while baked GI (like lightmaps in Unreal or Unity) is fantastic for static scenes but requires long bake times and significant memory.
For a game artist, the winning strategy is almost always a hybrid approach. A baked AO map gives you detailed, artist-controlled contact shadows with zero runtime cost. That’s your foundation for realistic 3D visualization.
Generate your AO map: The practical workflow
Creating an AO map is a process called baking, where you transfer surface detail and lighting information from a 3D model onto a 2D texture. The exact steps vary slightly between tools, but the core principles are the same.
How to create ambient occlusion maps in 3D software
Whether you're using Blender or Substance Painter, the goal is to cast rays out from the surface of your low-poly, game-ready mesh. The more rays that are blocked by nearby geometry (often from a detailed high-poly mesh), the darker the AO map becomes in that spot.
In blender:
1. Prep your meshes: You'll need two versions of your model: a low-poly version with clean UVs and a high-poly version with all the fine details. Make sure they occupy the same space.
2. Set up the bake: In the Render Properties tab, switch the Render Engine to Cycles. Go to the Bake panel and set the Bake Type to Ambient Occlusion.
3. Configure settings: Under the bake settings, you can control things like Margin (how far the bake extends beyond your UV islands to prevent seams) and Ray Distance. The Ray Distance is crucial; it determines how far rays will travel to look for occluding geometry. Too small, and you'll miss details; too large, and you might get unwanted shadows from distant objects.
4. Bake it: In the Shading workspace, create a new Image Texture node for your low-poly material, but don’t connect it to anything. Make sure it's the active node (it will have a white border). Select your high-poly mesh first, then your low-poly mesh. Hit Bake. Blender will then render the AO information onto your selected image texture.
In Substance Painter:
Substance Painter streamlines this process beautifully into its mesh map baking workflow.
1. Import your model: Import your low-poly .fbx file.
2. Open the baker: Go to Texture Set Settings and click Bake Mesh Maps.
3. Load your high-poly: In the baking window, you'll see a slot to load your high-poly mesh.
4. Configure and bake: Select Ambient Occlusion from the list of maps to bake. Key settings here include Ray Distribution, which controls how rays are cast, and the Min/Max Occluder Distance, which works like Blender's Ray Distance. You can also adjust the Secondary Rays to get more accurate, softer results. Once configured, hit Bake [Texture Set Name] and let Painter do the work.
Pro tips for a clean bake
Baking can feel like magic when it works and a nightmare when it doesn’t. 90% of baking issues come down to preparation.
- Nail your UVs: This is non-negotiable. Your UV unwrapping must be clean, with minimal distortion and no overlapping islands. Make sure you have enough padding between islands to accommodate the bake margin.
- Use a cage: For complex shapes, a standard ray projection can fail, causing artifacts. A cage is a slightly inflated version of your low-poly mesh that you use to guide the ray projection. It gives you precise control over the bake direction and prevents skewed shadows. Both Blender and Substance Painter support using a custom cage mesh.
- Troubleshooting common artifacts:
- Skewed or wavy lines: This is often a sign of mismatched geometry between your low-poly and high-poly, or that your ray distance is too large. A cage can fix this.
- Black spots or missing detail: This can happen if your ray distance is too small, or if parts of your high-poly mesh are intersecting the low-poly. The explosion method, baking each separate component of a model individually, can solve intersection issues.
Getting a clean bake is a skill, but once you master it, your texturing workflow becomes exponentially faster.
Implement AO in a PBR workflow
So you've baked a perfect AO map. Now what? Just dropping it onto the model isn't enough. Its real power is unlocked when you integrate it properly into a Physically Based Rendering (PBR) workflow.
Where to plug in your AO map for PBR texturing techniques
In modern game engines like Unreal Engine and Unity, shaders have a dedicated slot for the Ambient Occlusion map. This is, by far, the best place for it.
When you connect your AO map to this slot, the engine uses that data to selectively reduce ambient light on the model. It doesn't affect direct lighting at all. This means your model will still get bright highlights from the sun, but the crevices will remain softly shadowed, creating a much more natural look. This is a core component of good PBR texturing techniques.
There's an older, legacy method you might see in old tutorials: multiplying the AO map over the Albedo (or Base Color) map in a program like Photoshop. Avoid this. Doing so permanently darkens your base colors, which is physically incorrect. It bakes a lighting effect into your color information, making the asset look wrong in different lighting conditions. Always use the dedicated AO slot in the shader.
Go beyond shadows: Using AO to drive procedural textures
This is the workflow hack that separates the pros from the amateurs. Your AO map isn’t just for shadows; it's a map of nooks and crannies. And what happens in nooks and crannies? Dirt, dust, and grime accumulate.
In Substance Painter, you can use your baked AO map as a mask to drive procedural effects. Here’s how:
1. Create a new Fill Layer with the color of dirt or dust.
2. Add a black mask to that layer.
3. Add a Generator to the mask.
4. Select a generator like Mask Editor or a dedicated Dirt generator.
5. In the generator’s properties, you’ll find an Ambient Occlusion section. Tweak the sliders to use your baked AO map to control where the dirt appears.
You can instantly generate realistic weathering effects that are perfectly tailored to your model's geometry. This saves hours of hand-painting grime and gives you a result that feels physically grounded. It’s one of the fastest ways to add storytelling and realism to your textures.
Optimize your workflow: Performance and best practices
Creating a great AO map is one thing. Making sure it’s efficient and high-quality is another. In game development, performance is everything, and a few smart choices can make a huge difference.
Best practices for high-quality ambient occlusion maps
- Choose the right resolution: Not every map needs to be 4K. For a hero asset that the player will see up close, a 2K or 4K AO map might be appropriate. For a small background prop, a 512 or 1K map is likely more than enough. Use your texture budget wisely.
- 8-bit vs. 16-bit: When you bake, you often have the option to output a 16-bit texture. For AO maps, which are essentially smooth gradients, a 16-bit map can prevent banding and ugly step-like changes in the gradient. While you might not ship a 16-bit map in the final game (they use more memory), using one as your source file in Substance Painter will give you smoother results in your procedural masks. You can always export the final texture as 8-bit.
Save performance with channel packing
This is an industry-standard optimization that you need in your toolkit. Most game engines can read the Red, Green, and Blue channels of a texture as separate grayscale maps. Since AO, Roughness, and Metallic are all grayscale maps, you can pack them into a single texture to save memory.
This is called an ORM map: Occlusion in Red, Roughness in Green, and Metallic in Blue. Instead of loading three separate textures into memory, the engine only has to load one. This reduces the number of texture samples your shader has to make, improving rendering performance. Most modern tools, including Substance Painter, have export presets that will channel pack your textures for you automatically.
Combining baked AO with real-time screen-space AO (SSAO)
Finally, remember that you don’t have to choose between baked AO and real-time AO. You can, and often should, use both for the most realistic 3D visualization.
Your baked AO map provides the fine, detailed contact shadows specific to your asset's geometry. It’s high-quality and performance-friendly. SSAO, on the other hand, adds dynamic occlusion. When a character walks up to a wall, SSAO will create a soft, real-time shadow at their feet. It also helps occlude objects that aren't part of the same mesh.
The key is balance. Use your baked AO for the detailed, up-close shadows. Then, use SSAO with a slightly larger radius and lower intensity to handle the dynamic, scene-level interactions. By combining the two, you get the best of both worlds: the rich detail of a baked map and the dynamic responsiveness of a real-time effect.
More than just shadows
So, let’s circle back to that asset we talked about, the one that felt like it was floating in your scene. After everything we've covered, you can see that the fix isn't some complex lighting trick. It’s a single, powerful texture map.
Think of your AO map as more than just a layer for contact shadows. It’s a map of opportunity. It’s the blueprint for where dirt should gather, where grime should settle, and how an object has interacted with its environment over time. It’s the first and most crucial step in giving an asset a sense of history and place.
Mastering this workflow from a clean bake to smart PBR integration and channel packing doesn't just make your portfolio look better. It makes you a more efficient, more confident artist. You're not just painting pixels; you're building systems that create realism for you. That’s how you stay creative under pressure and deliver work that truly stands out.
You've got the knowledge. You’ve got the tools. Now go ground some assets and build worlds that feel real.

Max Calder
Max Calder is a creative technologist at Texturly. He specializes in material workflows, lighting, and rendering, but what drives him is enhancing creative workflows using technology. Whether he's writing about shader logic or exploring the art behind great textures, Max brings a thoughtful, hands-on perspective shaped by years in the industry. His favorite kind of learning? Collaborative, curious, and always rooted in real-world projects.
Latest Blogs

Your Skybox Is Wearing Thin: How 360 Textures Became the Engine
AI in 3D design
3D textures

Max Calder
Nov 28, 2025

More Than Skin Deep: How Facade Textures Drive Building Performan...
Industry trends
Texture creation

Mira Kapoor
Nov 26, 2025

From Pixelated Mess to Polished AR: Debug ARKit Texture Generator...
AI in 3D design
Texture creation

Max Calder
Nov 24, 2025
