Build Unity 3D Texture Atlas Workflows That Actually Ship
By Max Calder | 14 November 2025 | 14 mins read
Table of contents
Table of Contents
You’ve poured hours into getting that metal to look just right in Mari, only to face another step in the pipeline: texture atlasing. It can feel like tedious, technical busywork standing between your art and the game engine, especially when deadlines are tight. So, why do we bother? This guide is built to reframe that thinking. We're going to unpack how a smart texture atlasing workflow isn't just about shaving off a few milliseconds of load time; it's a core strategy for reducing pipeline bottlenecks, making your team more agile, and ultimately giving you more control over the final visual quality in Unity. We’ll move beyond the theory and the isolated tutorials for Blender or Maya. Instead, we'll walk through the entire practical pipeline from prepping your high-poly assets to the final import settings in Unity so you can build a system that works for you, saves your team headaches, and helps you ship projects that don't just look good, but run beautifully.

Why bother with a texture atlas in Unity?
Building a texture atlas feels like an extra step. You’ve already textured your assets, and they look great. Why add another layer of complexity? The answer is simple: performance. In game development, especially in a powerful engine like Unity, the number of instructions you send to the graphics card (the GPU) is a critical bottleneck. A texture atlas isn't just an organization tool; it's one of the most effective ways to slash that overhead and make your game run smoother.
Unpack the core benefits: Fewer draw calls, better performance
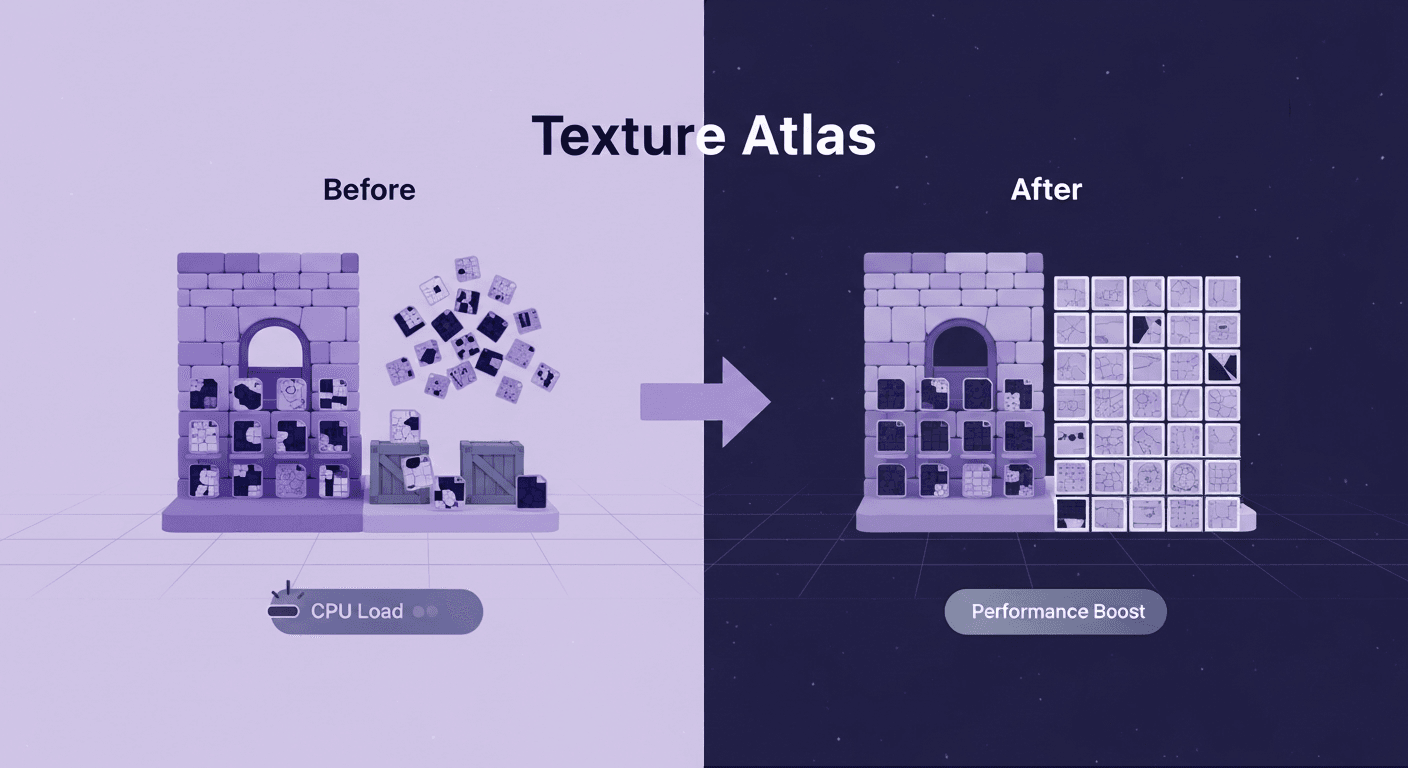
Think of your GPU as a highly skilled but very literal chef. Every time your game needs to render an object with a unique material, it sends a “draw call.” This is like handing the chef a separate recipe card. If you have 50 props in a room, each with its own material, you’re handing the chef 50 individual recipe cards. The chef has to stop, read the new card, grab the right ingredients (textures), and then cook. This context switching, stopping, and starting is what slows things down.
A texture atlas changes the game. By combining multiple textures into a single, larger texture sheet, you can use one material for all 50 props. Now, you’re handing the chef a single, master recipe card that covers everything. The GPU can render all those objects in one go, dramatically reducing the number of draw calls. This is the core principle of 3D graphics optimization: one atlas equals one material, which often means one draw call for a whole batch of objects. The performance gain isn't just theoretical; it's one of the first places experienced teams look to optimize when frame rates start to drop.
Understand the impact on memory usage and load times
Fewer draw calls are just half the story. Texture atlasing also has a massive impact on memory, specifically the video RAM (VRAM) on your GPU. Every texture you load takes up a chunk of this precious memory. While a 2048x2048 atlas takes up the same raw pixel space as four 1024x1024 textures, it's far more efficient in practice.
Here’s why: GPUs handle memory in blocks, and smaller, individual textures can lead to fragmentation and wasted space. Furthermore, texture compression, a vital technique to reduce memory usage in Unity game development, works more effectively on larger, consolidated textures. The compression algorithms can find more patterns and redundancies in a big image, resulting in a smaller memory footprint overall. This directly translates to faster load times. When your game loads a level, it’s not just pulling models from the disk; it’s loading all their associated textures into VRAM. Loading one large, compressed atlas is significantly faster than loading hundreds of small, individual files. For your team, this means quicker iteration cycles, and for the player, it means less time staring at a loading screen.
The pre-production workflow: Prepping your assets
Great results come from great prep. A texture atlas is only as good as the assets you feed into it. Rushing this stage will only lead to headaches later blurry spots, wasted space, and visible seams. Before you even think about packing textures, you need to get your models and UVs in order. This isn't just busywork; it's the foundation of an efficient and professional game asset texturing pipeline.
Organize and prep your 3D models for atlasing
First, finalize your models. Once you start the atlasing process, you don’t want to be going back to add or remove geometry, as that will force you to redo your UVs and bakes. Get sign-off on the models before you proceed. This discipline saves countless hours down the line.
Next, let’s talk about texel density. Think of it as the pixel resolution of your 3D model's surface. For objects to look consistent when placed next to each other, they need to have a similar texel density. You don't want a crisp, high-resolution crate sitting next to a blurry, low-resolution barrel. Before creating an atlas, decide on a target texel density for your project, say, 512 pixels per meter. Use a checker map or a built-in tool in Maya or Blender to ensure all the assets you plan to atlas together meet this standard. This consistency is the secret to making a scene feel cohesive and professionally made.
Master your UV mapping strategy for efficient packing
As a texture artist, you know that UV mapping can make or break a model. For texture atlasing, it’s even more critical. Your goal is to lay out your UV shells in a way that allows the packing algorithm to fit them together as tightly as possible, like a game of Tetris. Wasted space in your UV map is wasted VRAM.
Here are some pro tips for atlas-friendly UVs:
- Clean, non-overlapping shells: This is non-negotiable. Every UV shell must have its own unique space. Overlaps will cause textures to bake on top of each other, creating a mess.
- Straighten and orient: Wherever possible, straighten your UV shells into rectangular shapes. A machine can pack rectangles far more efficiently than organic, jagged shapes. Also, try to orient similar shells in the same direction. This not only helps with packing but can also reduce artifacts from texture compression algorithms, which often work in blocks.
- Mind the gaps: Don't pack your shells too tightly yourself. Leave a little breathing room between them. The texture packing tool will need this space to add padding, which prevents textures from bleeding into one another, especially at lower mipmap levels.
The main event: Unity 3D texture atlas creation
With your assets prepped and UVs pristine, it's time for the main event: actually creating the atlas. This is where you combine all your individual texture maps, diffuse, normal, metallic, etc., into a single sheet for each channel. While there are many tools for the job, the principles behind them are universal. Mastering these concepts will allow you to get great results no matter what software you're using.
Choose your texture packing tool
There’s no single best tool for Unity 3D texture atlas creation; it’s about what fits your workflow. Unity’s built-in Sprite Atlas is designed for 2D, but the principles of packing are the same. For 3D assets, you’ll typically turn to external solutions:
- 3D modeling software: Tools like Blender and Maya have built-in or plugin-based UV packing and texture baking tools.
- Dedicated baking software: Applications like Marmoset Toolbag or Substance Painter are industry standards for baking high-quality textures and can be used to generate atlases.
- Specialized atlasing tools: Some standalone tools are designed specifically for creating texture atlases.
The key isn’t the specific tool but its ability to efficiently pack UV shells and bake textures from multiple source objects onto a single target map. Focus on a tool that gives you fine control over the process.
Dial in your packing settings for optimal results
Once you’ve loaded your models into your chosen tool, you’ll be faced with several packing settings. Getting these right is crucial for avoiding common artifacts.
- Padding/Gutter: This is the empty space created around each UV shell in the atlas. It’s essential for preventing texture bleed, where pixels from one shell’s edge spill over onto an adjacent one. This is especially noticeable when mipmaps are generated. A good starting point is 8 to 16 pixels for a 2K or 4K map.
- Resolution: The final resolution of your atlas (e.g., 2048x2048, 4096x4096) should be determined by your target texel density and the number of assets you’re including. Don't just default to 4K if you don't need it. A well-packed 2K atlas is better than a sparse 4K one.
- Layout strategy: Most tools use a recursive algorithm to pack shells as tightly as possible. Let the tool do the heavy lifting, but ensure it respects your pre-existing shell orientation to maximize efficiency.
Bake your textures into a single map
The final step is baking. This process transfers the texture information from your individual assets onto the new, combined atlas layout. You'll need to do this for every texture channel you use: Albedo, Normal, Roughness, Metallic, Ambient Occlusion, etc.
The workflow is straightforward: for each map type, you set all your individual source textures as the input and the new, empty atlas texture as the output. The baker will use the packed UV layout to transfer the pixels. The most important thing here is consistency. The UV layout, padding, and resolution must be identical for every map you bake. If the normal map is baked with a slightly different layout than the albedo map, they won't line up, and your lighting will look completely broken in Unity. Create a baking preset and reuse it for each channel to ensure perfect alignment.
Implementation: Getting your atlas live in Unity
You’ve done the hard work of prepping, packing, and baking. Now you have a beautiful set of texture atlas maps. The final step is to bring them into Unity and hook everything up. This is where you’ll see the payoff in both performance and workflow simplicity.
Import and configure your texture atlas
Importing your new atlas maps into Unity is simple, but the import settings are critical for both visual quality and render performance optimization. Here’s a quick checklist:
- Albedo/Diffuse map: Ensure sRGB (Color Texture) is checked. This tells Unity to treat it as a color map and handle the gamma correction properly.
- Normal map: Set the Texture Type to Normal Map. This will uncheck sRGB and format it correctly for the lighting engine. You may also need to check Create from Grayscale if you're using a height map.
- Mask maps (metallic, roughness, and AO): For maps that contain data rather than color (like metallic, roughness, and AO, often packed into a single texture's RGB channels), you must uncheck sRGB. These maps should be treated as linear data.
- Texture compression: This is huge. Under the platform-specific settings, choose an appropriate compression format. ASTC is great for mobile, while BC7 offers high quality for PC. This is what actually shrinks the texture size in VRAM.
Remap your models to use the new atlas material
With your textures correctly imported, the final part of the texture mapping in Unity process is a breeze. It's time to replace all those individual materials with a single, efficient one.
- Create a new material: In your Unity project, create a new material and name it something descriptive, like M_Props_Atlas_01.
- Assign the atlas textures: Drag your newly imported albedo, normal, and mask maps from the Project window into the corresponding slots on the new material in the Inspector.
- Apply to your models: Select all the 3D models in your scene that you included in the atlas. You can do this quickly by searching for them in the Hierarchy.
- Drag and drop: With all the models selected, drag your new atlas material onto them in the Scene view or into the Materials slot in their Mesh Renderer component.
And that’s it. You've just replaced potentially dozens of materials and draw calls with one. Fire up the Frame Debugger (Window > Analysis > Frame Debugger) to see the difference. The proof is right there: a cleaner, faster render loop.
Post-production: Optimization and best practices
Getting your texture atlas working in Unity is a major milestone, but don't stop there. A few advanced strategies and troubleshooting tips can elevate your game performance texturing from good to great. These are the details that separate amateur work from a truly professional, optimized pipeline.
Optimize game performance with texture atlasing techniques
Mipmapping is Unity's way of using lower-resolution versions of a texture when an object is far from the camera. This is crucial for performance. However, with a texture atlas, aggressive mipmapping can cause bleeding between UV shells if your padding is insufficient. Always inspect your atlas for objects at a distance to ensure no colors are leaking from adjacent textures. If you see artifacts, your first fix should be to increase the padding in your baker and re-export.
Another key strategy is knowing when not to use a single giant atlas. It can be tempting to cram everything onto one 8K map, but that's often a mistake. Here’s a better approach:
- Group by proximity: Atlas objects that are likely to be seen together. For example, all the furniture and props for a single room make a perfect atlas set. This improves caching and rendering efficiency.
- Group by shader: Combine objects that use the same shader. You can't atlas a standard opaque object with a transparent glass one, as they require different materials and render queues.
- Characters vs. environments: Characters often get their own dedicated atlases for their armor, body, and accessories. Static environment art is usually grouped into separate, larger atlases.
Troubleshoot common texture atlas problems
Even with a perfect workflow, issues can pop up. Here’s a quick checklist for debugging the most common problems:
- Visible seams or edges: This is almost always a padding or baking issue. Your baker needs an edge bleed or dilation setting that extends the pixels beyond the UV shell border. Increase this value and rebake.
- Incorrect lighting or bumps: If your normals look wrong, it's likely an import setting. First, confirm your Normal Map texture in Unity is set to the Normal Map type. If that doesn't fix it, the green channel (Y) might be flipped. Some bakers export for DirectX (Y-) while Unity uses OpenGL (Y+). Most bakers have a checkbox to flip the green channel on export.
- Blurry or low-res textures: This points to a texel density problem. Either the atlas resolution is too low for the number of shells you've packed in, or the original UVs weren't scaled large enough. You can't create detail that wasn't there to begin with.
- Glows or dark halos: If you are baking lighting information like Ambient Occlusion, make sure you are baking with a cage mesh that properly envelops your low-poly model. Incorrect cage projection is a frequent cause of these artifacts.
Beyond the bake: Making the atlas work for you
We’ve covered a lot of ground from UV prep to import settings. It's easy to look at texture atlasing as a purely technical chore, the final, unglamorous step before your art gets into the engine. But the real shift happens when you stop seeing it as a task and start treating it as part of your craft. Think of it this way: it’s the difference between knowing how to paint and knowing how to hang a gallery. One is about creating the art, the other is about ensuring it’s presented perfectly.
Mastering this workflow isn't just about boosting frame rates. It's about building a pipeline you can depend on. It’s about making last-minute changes less painful and turning re-baking everything into a predictable process, not a weekend-ruining emergency. When you build a smarter system, you’re not just saving VRAM; you’re saving your team headaches and creating more room for what actually matters: the art itself.
So take these steps, tweak them, and make them your own. The goal isn't just to create a texture atlas. It's to own your workflow from start to finish, giving you the confidence to ship amazing work that runs beautifully. You’ve got the toolkit now, go build something incredible.

Max Calder
Max Calder is a creative technologist at Texturly. He specializes in material workflows, lighting, and rendering, but what drives him is enhancing creative workflows using technology. Whether he's writing about shader logic or exploring the art behind great textures, Max brings a thoughtful, hands-on perspective shaped by years in the industry. His favorite kind of learning? Collaborative, curious, and always rooted in real-world projects.
Latest Blogs

A Practical Guide for How to Choose The Right Concrete Texture fo...
3D textures
PBR textures

Mira Kapoor
Apr 29, 2026

VR Textures in Unreal Engine: A Beginner’s Guide to Setup, Optimi...
3D textures
AI in 3D design

Max Calder
Apr 27, 2026

360 Environment Textures vs Traditional Textures: Key Differences...
AI in 3D design
PBR mapping

Max Calder
Apr 24, 2026
