Beyond Bump Maps: A Definitive Guide to Displacement Mapping
By Max Calder | 11 September 2025 | 14 mins read
Table of contents
Table of Contents
In the world of 3D, we spend most of our time as masters of illusion. We use clever tricks like Normal and Bump maps to fake the depth that makes our worlds feel real, convincing the player's eye to see detail that isn't truly there. But what happens when the illusion isn't enough, and you need that rocky ground to actually be rocky? This is where the Displacement Map comes in, the one tool in your texturing kit that stops faking it and starts physically reshaping your models. In this guide, we're breaking down exactly how this powerful map works, how it stacks up against its illusory cousins, and how you can use it to give your environments that critical layer of geometric realism without bringing your frame rate to its knees.

Unpacking the displacement map: It's all about real geometry
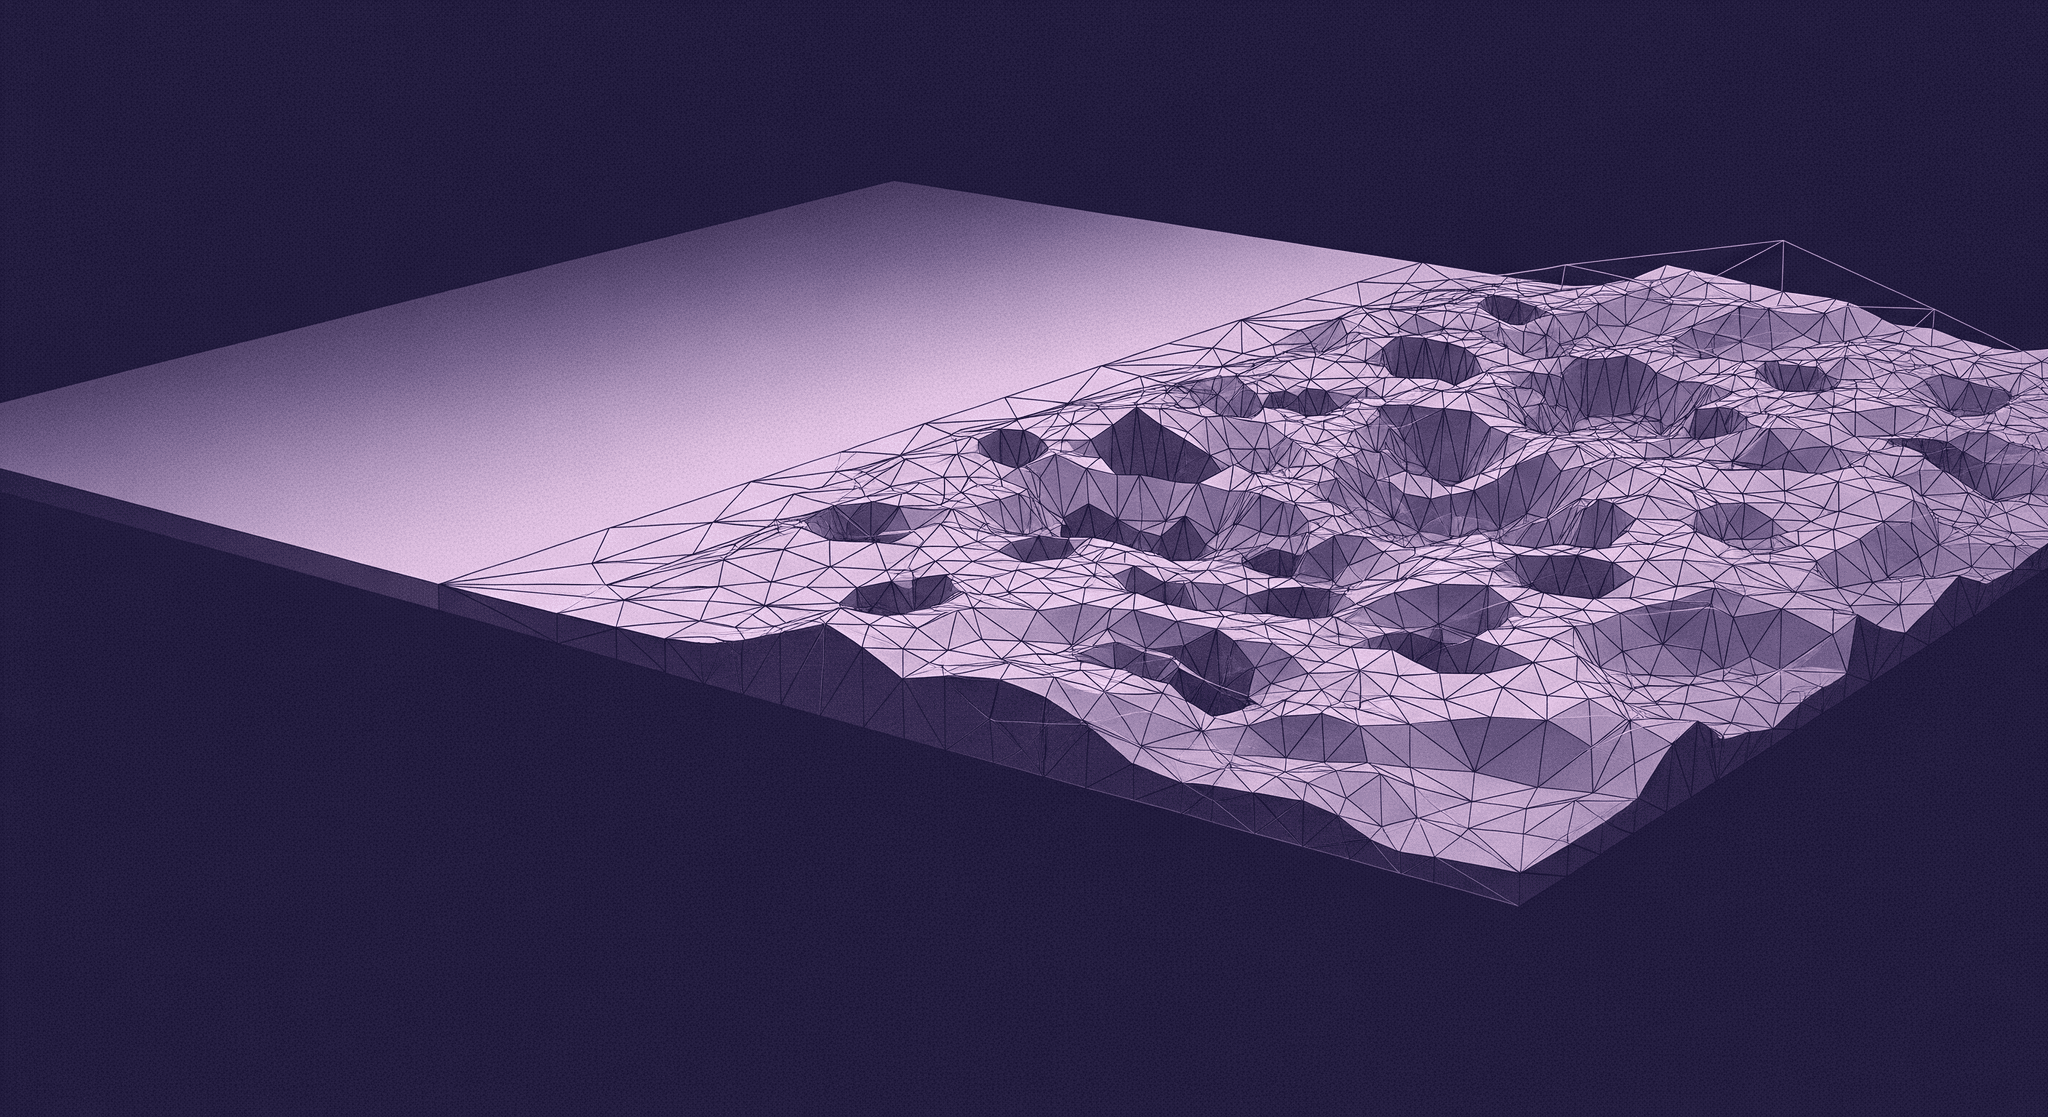
Most texture maps are clever fakes. They’re masters of illusion, playing with light to trick your eyes into seeing depth that isn’t there. But a Displacement Map is different. It’s not a fake. It’s a set of instructions that tells your 3D software to physically move the vertices of your model.
Think of it less like a coat of paint and more like a tiny, automated sculptor, chiseling away at your mesh based on a grayscale image. It’s the only one of the common map types that alters the actual, physical shape of your object. This is a critical distinction, and it’s where the magic lies.
How displacement maps modify actual 3D geometry
The core mechanism is surprisingly straightforward. The map is a texture, just like any other, but the engine interprets its color information as height data. It reads the grayscale values of the map on a per-vertex basis and pushes or pulls the geometry accordingly.
This creates true surface deformation. Unlike a Normal Map, which just fakes the way light bounces off a surface, a Displacement Map changes the model's silhouette. A displaced cobblestone path will have stones that actually stick out, casting real shadows on their neighbors and occluding what’s behind them from certain angles. If you were to look at the edge of a displaced brick wall, you would see the jagged, uneven profile of the bricks and mortar, not a perfectly flat plane.
This is a fundamental shift from visual trickery to genuine geometric surface modification. The result is a level of realism and depth that illusions can’t replicate, especially in close-up shots or in virtual reality, where parallax and depth perception are crucial for immersion.
The anatomy of a displacement texture
A displacement map is essentially a heightmap. The rules are simple and universal across almost all 3D software:
- White: Represents the maximum height or outward displacement. Vertices in areas under pure white pixels get pushed out the furthest.
- Black: Represents the minimum height or inward displacement. Vertices here get pushed in the most (or are left at the lowest point).
- 50% Gray: This is the neutral ground, the zero point. Vertices under mid-gray pixels don't move at all.
But here’s a detail that separates the pros from the beginners: bit depth. You’ve probably seen textures saved as 8-bit, 16-bit, or even 32-bit files. For displacement, this choice is everything.
An 8-bit image (like a JPG or most PNGs) can only store 256 levels of gray. When you try to stretch those 256 steps across a smooth surface, you get visible banding or terracing, making your displaced surface look like a topographical map. It’s ugly and immediately breaks the illusion.
A 16-bit image (like a TIFF or some PNGs), on the other hand, can store 65,536 levels of gray. That massive increase in precision allows for incredibly smooth gradients and subtle height variations, eliminating those nasty terracing artifacts. A 32-bit EXR file goes even further, offering unparalleled precision that’s perfect for high-end cinematic work or baking complex sculpts.
So, the rule is simple: if you’re serious about displacement, always use a 16-bit or 32-bit texture. Your surfaces will thank you.
Displacement vs. Normal vs. Bump: Choosing the right tool for the job
Alright, so you have three common ways to add surface detail: Bump, Normal, and Displacement maps. Using the right one for the right job is key to creating assets that are both beautiful and performant. They’re not interchangeable; they’re specialized tools in your texturing toolkit.
When to use a Bump Map: Simple, fast, but limited
A Bump Map is the original lighting trick. It’s a simple grayscale image that tells the renderer to make pixels appear lighter or darker to simulate bumps and dents. It’s the cheapest of the three in terms of performance because it’s just a minor shading calculation.
- Best for: Extremely fine, low-frequency details where the silhouette will never be an issue. Think of things like the subtle texture of an orange peel, the grain on a sheet of leather, or the microscopic pores in skin. It adds a bit of surface noise without any real computational overhead.
- The catch: It’s a very basic illusion that falls apart fast. Since it doesn’t know anything about the direction of the surface, the lighting effect can look flat or strange. And if you view the surface from a steep angle, the illusion is completely shattered; you’ll see the perfectly flat geometry underneath.
When to use a Normal Map: The industry standard for game assets
This is the workhorse of modern 3D texture techniques, especially in game development. A Normal Map is a more advanced illusion. Instead of just faking height with light and dark pixels, this RGB image stores directional data, telling the engine precisely how light should bounce off every single pixel on your low-poly model as if it were a high-poly sculpt.
- Best for: The vast majority of surface details on game assets. Screws, panel lines on a spaceship, fabric weaves, stone cracks, wood grain—a Normal Map handles all of this beautifully. It’s the core of the high-poly to low-poly baking workflow that lets us have incredibly detailed characters and props that can run in real-time.
- The catch: It’s still just a trick. A very, very good trick, but a trick nonetheless. A normal-mapped surface is still geometrically flat. Look at it from a grazing angle, and the silhouette will be a perfectly straight line. The bolts on that sci-fi crate don’t actually stick out; they just look like they do from the front.
When to use a Displacement Map: For details that break the silhouette
This is where you bring in the heavy hitter. You use a Displacement Map when the illusion isn’t enough and you need real geometry. When the surface detail is so significant that it needs to affect the model’s outline, cast its own shadows, and interact with the world like a real object.
- Best for: Large-scale surface changes. Think of a cobblestone street where the stones have tangible depth, a rocky cliff face with jutting ledges, deep grout lines in a brick wall, or the complex surface of a coral reef. These are all scenarios where a flat silhouette would instantly kill the realism.
- The catch: Power comes at a price. Because it’s generating real geometry, displacement is by far the most computationally expensive of the three. It requires your base mesh to have a significant number of polygons to work with, or for your render engine to generate them on the fly using a feature called tessellation. This performance cost is the primary reason we don’t use it on every single asset.
From texture to geometry: A practical workflow
Knowing what a displacement map does is one thing. Actually getting it to work is another. Let’s break down the process into a repeatable workflow that you can use in Blender, Unity, Unreal, or any other modern 3D tool.
Step 1: Generating a high-quality displacement map
Your final result is only as good as the map you start with. High-quality displacement maps typically come from a few key sources:
- Baking from a high-poly sculpt: This is the most common method in character and asset creation. You sculpt an incredibly detailed model in something like ZBrush or Blender, then you bake the height information from that sculpt down onto a texture map for your low-poly, game-ready model.
- Procedural generation: Tools like Substance Designer and Painter are king here. You can create complex, realistic surfaces like cracked mud, peeling paint, or rocky ground by layering procedural nodes. The beauty is that you can export a perfectly matched set of maps, Normal, Roughness, and Displacement, all from the same graph.
- Photogrammetry/Scans: Using software to process photos of real-world objects can produce incredibly realistic textures. Many online texture libraries, like Texturly, provide scan-based displacement maps that offer unparalleled realism.
Pro tip: No matter the source, check your map's histogram. You want a map that uses the full range from black to white. A washed-out, low-contrast map won't have enough data to create a dramatic effect. You need that dynamic range to drive the polygon surface deformation.
Step 2: Preparing your mesh for vertex manipulation
This is the step where most people get stuck. You apply a displacement map to your 12-polygon cube and… nothing happens. Why?
Because displacement needs vertices to move. If there are no vertices, there’s no displacement. It’s that simple. You have two main ways to solve this:
- Subdivision: The old-school method. You manually add a subdivision modifier (like Subdiv) to your mesh in your modeling software. This multiplies the number of polygons, giving the displacement map more points to work with. The more detailed your map, the more subdivisions you’ll need.
- Dynamic tessellation: The modern, smarter method used in game engines and modern renderers. Instead of subdividing the whole mesh upfront, tessellation shaders add and subdivide polygons on the fly during rendering. Even better, they can do it adaptively, adding more polygons to parts of the mesh closer to the camera and fewer to those far away. This is the key technology that makes displacement feasible in real-time applications like Unity and Unreal Engine.
The common mistake: Applying a high-resolution displacement map to a low-resolution mesh and expecting a miracle. Always ensure your mesh has enough geometric density, either pre-subdivided or with tessellation enabled, to support the detail in your map.
Step 3: Applying and tweaking the map in your 3D software
Once your map and mesh are ready, you plug the texture into the Displacement or Height slot in your material shader. But you’re not done yet. You’ll need to fine-tune two key parameters:
- Height / Scale: This is the master intensity slider. It controls the maximum distance the vertices will be pushed or pulled. It's a multiplier for the map’s values. Start with small values and gradually increase it until you get the depth you’re looking for. Overdoing it can lead to ugly, stretched polygons and rendering artifacts.
- Midlevel / Zero level: This value tells the engine which grayscale value in your map should be considered no change. By default, it’s usually 0.5 (for maps where 50% gray is neutral) or 0 (for maps that only displace outward from black). Setting this correctly is crucial to ensure your surface displaces in the right direction and doesn't look like it's floating or sunken into the ground.
Once you see your mesh physically changing shape in the viewport, you know you've got it right. From there, it's all about artistic tweaking to dial in the perfect look.
Balancing realism and performance: Best practices
Using displacement is a power move, but it comes with a performance budget. You can’t just slap it on everything and expect your game to run at 60 FPS. The secret is to use it strategically, combining it with other techniques to get the most bang for your buck.
Understanding the performance cost
So, why is displacement so expensive? Every new vertex created through subdivision or tessellation adds to the workload of your GPU. More vertices mean more data to process for every single frame. A simple plane subdivided a few times can quickly jump from a dozen polygons to tens of thousands. When that mesh is animated, lit, and shaded, the cost multiplies.
This is why in games, full-on geometric displacement is often reserved for specific use cases:
- Hero assets: A key cinematic prop or a central character that will get a lot of screen time might get the full displacement treatment.
- Terrain and landscapes: Modern engines use advanced tessellation and LOD (Level of Detail) systems to apply detailed displacement to terrain close to the player while simplifying it in the distance.
- Cinematics: For pre-rendered cutscenes where real-time performance isn't a concern, artists can crank up the displacement quality for maximum realism.
For the average background prop, a well-made Normal Map is almost always the more efficient choice.
Combining maps for ultimate efficiency
Here’s the pro workflow that gives you the best of both worlds. You don’t have to choose between just a Displacement Map or just a Normal Map. You can and should use them together.
The hybrid approach is simple:
- Use a Displacement Map for the large, primary forms that actually change the silhouette. For a brick wall, this would be the map that pushes the bricks out and pulls the mortar in.
- Then, layer a Normal Map on top to handle all the fine-frequency surface details. This would add the tiny cracks, pits, and sandy texture to the surface of each individual brick and the rough texture of the mortar.
By doing this, you don't need to subdivide your mesh into millions of polygons to capture every tiny crack. You let the displacement handle the heavy lifting of the overall shape, and let the cheap, efficient Normal Map handle the surface polish. It’s a perfect division of labor that delivers maximum detail for a balanced performance cost.
Know your engine: Adaptive tessellation and other tricks
Game engines are constantly getting smarter about how they handle complex geometry. Features like adaptive tessellation are a game-changer for using displacement efficiently. The principle is to only pay for the detail you can see.
Here's how it works: The shader evaluates how far an object is from the camera and how much screen space it occupies. A rocky cliff right in front of you will be heavily tessellated, with thousands of polygons being generated to show off that crunchy displacement detail. But that same cliff seen from a kilometer away might be simplified down to its original low-poly form, with the Normal Map taking over.
Both Unity's High Definition Render Pipeline (HDRP) and Unreal Engine have powerful tessellation and displacement features built into their material editors. Learning how to use them is essential for any environment artist. It allows you to create vast, detailed worlds that look incredible up close without bringing your machine to its knees. It’s all about spending your polygon budget where it matters most: right in front of the player's eyes.
Beyond the illusion: Making smarter choices
So, we've unpacked the whole toolkit from the quick fakes and clever illusions to the geometric heavy-hitter. At the end of the day, the choice between a Bump, Normal, or Displacement map isn't just a technical decision. It’s an artistic one.
It’s about looking at your asset and asking the right question: What story does this surface need to tell, and what’s the most efficient way to tell it? Does this detail need to break the silhouette? Does it need to cast a real shadow that affects other objects? Or is a clever lighting trick more than enough?
You now have the insight to answer those questions. You can stop guessing and start texturing with intention, knowing exactly when to save performance with a slick Normal map and when to spend that polygon budget on a Displacement map that makes a rocky path feel truly real.
That’s the goal, right? To move past just making things look cool and start building worlds that feel right. You’ve got the knowledge. Now go make your geometry tell a better story.

Max Calder
Max Calder is a creative technologist at Texturly. He specializes in material workflows, lighting, and rendering, but what drives him is enhancing creative workflows using technology. Whether he's writing about shader logic or exploring the art behind great textures, Max brings a thoughtful, hands-on perspective shaped by years in the industry. His favorite kind of learning? Collaborative, curious, and always rooted in real-world projects.
Latest Blogs

A Practical Guide for How to Choose The Right Concrete Texture fo...
3D textures
PBR textures

Mira Kapoor
Apr 29, 2026

VR Textures in Unreal Engine: A Beginner’s Guide to Setup, Optimi...
3D textures
AI in 3D design

Max Calder
Apr 27, 2026

360 Environment Textures vs Traditional Textures: Key Differences...
AI in 3D design
PBR mapping

Max Calder
Apr 24, 2026
